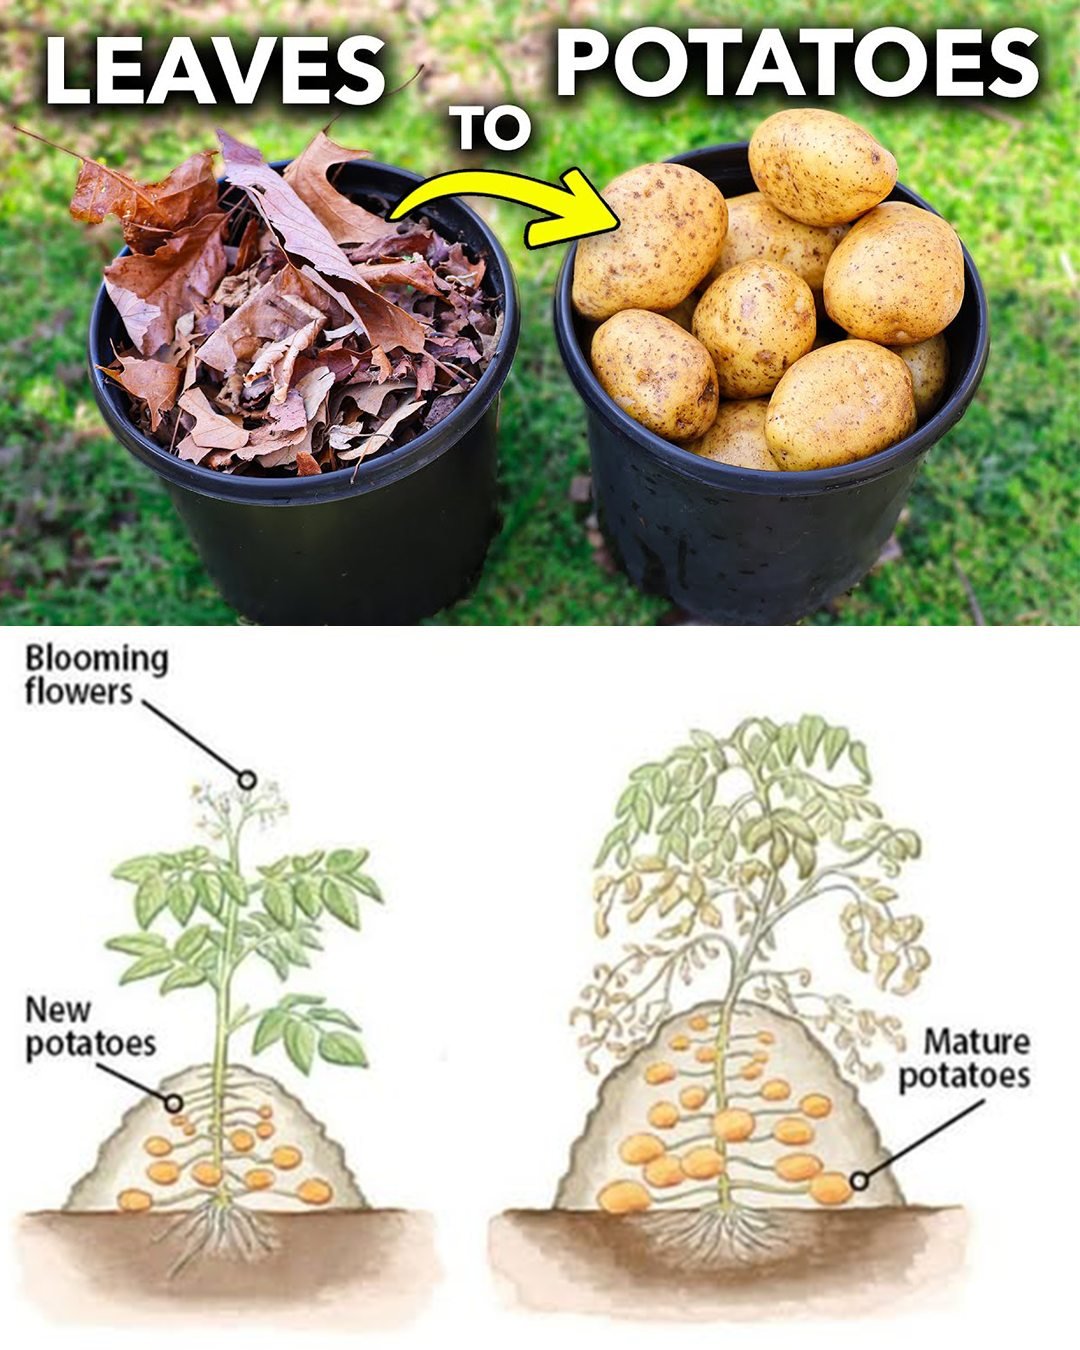
Short answer: yes—you can raise a potato crop using nothing but shredded autumn leaves as the growing medium. Better answer: it’s a fun, low-cost experiment with real food at the end, but it needs care to avoid soggy, scabby, or undersized tubers. Below is an original, step-by-step method (“the recipe”) plus pro tips to improve yield, reduce problems, and keep it simple for home gardeners.
Why Try Leaf-Only Potatoes?
- Free & abundant: Bagged fall leaves are everywhere.
- Lightweight hilling: Leaves are easy to add as plants grow.
- Soil building: After the season, partially decomposed leaves improve bed structure.
The catch: whole, unshredded leaves mat, hold too much moisture, and block airflow. Shredding is absolutely essential, and nutrition/aeration must be managed.
Materials
- Seed potatoes (any variety you like; firm, disease-free, with “eyes”)
- Shredded leaves (mulched with a mower or chipper; no hay or weedy seedheads)
- All-purpose fertilizer (organic or synthetic—moderate nitrogen, good potassium)
- Water source
- Optional: a 1×8–12 ft raised bed or 5-gallon food-safe buckets with drainage holes
Leaf prep: Run dry leaves under a lawn mower with bag attached. You’re aiming for fluffy, diced leaf pieces that don’t re-mat when wet.
Spacing & Depth “Recipe” (Leaf-Only Method)
Raised Bed Method
- Set the bed: A simple frame (e.g., ~1 ft × 8 ft) on a cleared area is enough. Bare ground is fine.
- Place seed potatoes: Lay tubers on the surface of the ground inside the bed, about 6 inches apart. No need to pre-bury.
- Initial cover: Add ~5 inches of shredded leaves over the tubers.
- Light feeding: Dust a balanced fertilizer on top and mix it into the top few inches of the leaf layer.
- Water in: Moisten thoroughly to settle leaves around the tubers.
Bucket Method (Containers)
- Prep container: Use a food-safe 5-gallon bucket and drill several holes in the bottom for drainage.
- Base layer: Add 5–6 inches of shredded leaves to the bottom. Wet and fluff so the layer is evenly moist—not soggy.
- Set seed potatoes: Place 3 small tubers evenly spaced on that leaf layer.
- Cover: Add ~5 inches of shredded leaves.
- Fertilize & water: Lightly incorporate fertilizer into the top few inches of leaves and water well.
Hilling With Leaves (The Secret to Success)
As shoots grow, you’ll “hill” them—adding more shredded leaves to bury stems and keep sunlight off developing tubers (prevents greening and toxins). It also encourages more tuber set along the buried stems.
- When stems reach 15–20 cm (6–8 in), gently pull leaves around the base to raise the level.
- Repeat hilling whenever foliage gains another 10–15 cm (4–6 in).
- In leaf-only systems, leaves settle fast. Be prepared to re-apply 2–3 extra times through the season.
Tip: Leaf layers should be light and fluffy. Don’t compress; potatoes need air.
Watering & Feeding
- Moist, not soggy. Leaves hold water; daily checks in hot weather help you avoid waterlogging.
- Fertilizer strategy: A small, regular top-dress at each hilling is better than a single heavy dose. Lightly scratch it into the top few inches of leaves, then water.
What to Expect at Each Stage
- 10–14 days: Sprouts push through leaf cover.
- 3–5 weeks: Foliage deepens green; plants may look tall but a bit “soft” due to the loose medium.
- Flowering: Early tubers are forming—keep hilling so no light reaches them.
- Mid–late season: Leaves will sink significantly; top up again if stems are exposed.
Harvest Window & Technique
- When foliage yellows and dies back, leaves have done their job. That’s your cue.
- In beds, pull plants and rake back the leaf mulch with your hands to reveal tubers.
- In buckets, tip out the contents and sift through the fluffy, compost-like leaves.
Reality check: Leaf-only crops can be smaller and more blemished than soil-grown potatoes if moisture and nutrients aren’t managed well. You’re trading convenience and cost savings for a bit of yield and cosmetic quality.
Troubleshooting & Pro Tips (Learned the Hard Way)
- Matting & air loss: Never use whole leaves. Always shred. Re-fluff layers with fingers when re-hilling.
- Sinking layers: Expect substantial settling. Plan multiple top-ups so developing tubers always stay covered.
- Too wet, scabby/ugly skins: Leaves can stay constantly damp, inviting blemishes. Improve airflow, water only when needed, and avoid compressing the layer.
- Nutrient leaching: In a purely leafy medium, soluble fertilizers can wash downward. Favor small, repeated feedings and consider slow-release sources.
- Plant support: Leaf hilling doesn’t brace stems like soil does. Slight flop is normal. Gentle side-hilling helps.
- Critters: Loose, organic layers attract curious wildlife. Side boards, mesh collars, or row cover can help deter digging.
Upgrades if You Want Better Results
If you love the concept but want more reliable yields, try these leaf-forward hybrids:
- Leaf + Soil/Compost Sandwich: Start with 5–8 cm (2–3 in) of compost or garden soil at the bottom, place seed potatoes, then cover with leaves. Hill later with leaves only. That bit of mineral soil improves structure and nutrient retention.
- Leaf + Straw Mix: If straw is available, blend 50/50 with shredded leaves to improve drainage and reduce matting.
- Add Minerals: A light dusting of wood ash (potash) or greensand at hilling (sparingly) can support tuber quality. Avoid excess ash in alkaline soils.
- Perforated Sidewalls (Containers): Fabric pots or buckets with extra side holes improve aeration and reduce sogginess.
Leaf-Only Potato “Recipe” Card (Printable Summary)
- Place tubers: on ground (bed) or on a moistened 5–6 in leaf base (bucket), 6 in apart.
- Cover: ~5 in shredded leaves.
- Feed: light, balanced fertilizer mixed into top few inches of leaves.
- Water: thoroughly, then as needed—never waterlog.
- Hill: every time stems add 4–6 in, re-cover with fluffy shredded leaves.
- Top up repeatedly (leaves settle).
- Harvest: when foliage dies back; pull plants and sift leaves.
Final Thoughts
Growing potatoes in only shredded leaves is a genuine, low-cost experiment that produces food and creates future soil—even if the tubers aren’t beauty-contest winners. If you’re chasing maximum yield and clean skins, incorporate a thin soil/compost base and still hill with leaves. If you’re chasing simplicity and recycling, go pure-leaf, keep layers fluffy, feed lightly but often, and stay on top of hilling as the leaves sink.
Either way, you’ll learn a ton, build organic matter, and likely pull a satisfying basket of homegrown spuds at season’s end.
Inspired by this? Share the article with your friends!